
Path Planning in Highways for an Autonomous Vehicle
This article is the write up for my Path Planning project for Term 3, of the Udacity’s Self Driving Car NanoDegreee. The entire article assumes knowledge of how the Udacity Term 3 simulator works.
Introduction
Path planning is an interesting problem. In essence, it’s the process of finding a safe, comfortable and efficient (in that order) path through a set of dynamic maneuverable objects to reach our goal. Now let’s break it down.
Traditionally, say if we wanted to find a route between a source and a destination, and we wanted to find the fastest / shortest path, there are tons of algorithms to do this: Dijkstra’s, Breadth First Search, [A](https://en.wikipedia.org/wiki/A_search_algorithm), etc…. But in a road scene, whether it be a highway or urban roads, one of the most important difference is that the scene is not static. So our plan needs to be a dynamic one too.
What complicates the scenario even further is, while we can track the other objects with Sensor Fusion(dynamic such as other cars, pedestrians, bikes, etc…., and static such as trees, curbs, lamp posts), the dynamic object’s behaviour can dynamically change; i.e: they can be maneuvered. So a simple extrapolation based on the current tracked information, say from a Kalman Filter, would be insufficient for the task, as the car could suddenly change lane, or the pedestrian could suddenly stop midway during a road cross to message someone (those idiots!! :P).
Behaviour prediction of Maneuverable Objects
So the first step is to predict the behaviour of all dynamic objects on the scene, and then based on this, predict a trajectory for each of the them. This is a pretty difficult task, since each of the object on the scene have a lot of choices in them. The method to solve them is to use something that is known as multiple-model algorithms for maneuvering target tracking. These methods allow us to evaluate multiple different models (such as: continue straight, turn left, turn right, slow down, speed up, and combinations of these) simultaneously for each of the object, and then based on the current observation (do we see him speed up, or turn, etc…) the algorithm would assign a probability to each of the model for each of the object. Once the probability reaches a certain threshold, we could assume that behaviour for that object and generate a predicted trajectory for that object based on that behaviour.
In my current implementation of the path planner (shown at the end of this article), this step is not implemented, as an extensive behaviour prediction was not necessary for the case of a simple highway driving. But for urban driving scenes, this almost becomes mandatory. Think of a intersection ;).
Behaviour Planning
Now that we’ve the predicted trajectories of each of the objects around us, the next step is to plan our behaviour. Do we in turn, speed up, slow down, change lanes, etc… This comes down to two things (and I’m going to be specific to highway scenario).
- Estimating a score for each lane, to determine the best lane for us to be in (efficiency)
- Evaluating the feasibility of moving to that lane in the immediate future (safety & comfort)
So the three factors that we mentioned in the problem statement are covered here in the two points.
Ranking Lanes
The method I took to rank lanes are using the following 3 factors
- The lesser the number of lanes we need to change, the better. Because the lesser we change lanes, the more comfortable the drive is for the passengers (takes care of comfort)

- The distance of the car ahead of us in that lane. The more the distance, the better the score

- The velocity of the car ahead of us in that lane. The greater the velocity, the faster we can travel in that lane, before being forced to change lane again.

Note:
- If a particular lane does not have any car ahead of us, then it would get the full score of the corresponding weights for velocity & distance scores.
- We could augment this with other factors such as number of cars ahead of us in that lane, slowest car ahead of us in the lane (not just the closest car), include the behaviour prediction we talked about in section 1, etc…
Feasibility Checks
Now that we’ve ranked the lanes, we now need to check if transition to that lane is feasible or not! This is done with the following flow.
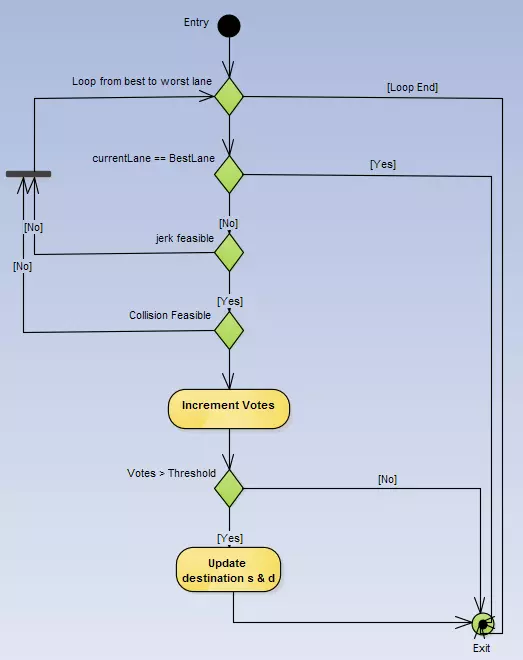
- Loop across the lanes in the order from best to worst lane.
- If the currently looped lane is our current lane, then nothing to do, everything is great, keep moving, break the loop.
- If not, then check if the new lane would be jerk & collision feasible. The sections below explain how this is done.
- If they are feasible, then increment a vote count, just so that we don’t take instantaneous decisions. We want to take decisions after pondering them over several timesteps. So once this vote count reaches a threshold, we can take up the decision.
- Once the votes are there, then we output the desired
d: the destination laneand the desireds/time: the velocity. - The s/time parameter is essentially based on the car ahead of us and if there is no car, then it aims for the maximum velocity without breaking the speed limit.
Jerk & Collision Feasible checks
There are many different ways this can be done. The way I chose to do here is the following
Experimentally, I identified that at the speed limit of 50mph, a single lane change is always jerk feasible. This is automatically taken care by the trajectory generation described below. But a double lane change has chances that it would jerk too much (this depends on the road curvature). If the road is curving in one way, and we try to jump 2 lanes in the other direction, then there is a chance that we would violate the jerk limit. So for jerk checks, I just check that the current speed should be less than a threshold if we are doing more than a single lane change.
Collision feasibility is more interesting. Essentially, we want to ensure that there is a good 2 or more car length gap between our car and the other cars in the destination lane and all the intermediate lanes (in case of more than a single lane change). We should also consider in the velocity of the other cars while coming up with this window, i.e: a fast car behind us means we need more window behind us, a slow car ahead of us means we need more window ahead of us.
Trajectory Generation
This is by far the most critical and the most difficult step to implement in this entire project. The solution I implemented is inspired from John Chen: the idea of converting all coordinates to local car’s co-ordinate system to make things easier.
In this, I heavily depend on ttk:spline for most of the trajectory generation.
The Udacity simulator gives us the previous path after removing all used up points. This is a great starting point for the algorithm which essentially is:
- Create a spline of the nearest surrounding waypoints in the car’s reference frame. The waypoints must be converted to the car’s reference and should be aimed for the ‘s/time’ and ‘d’ output from the behaviour planner. Let’s call it the waypointSpline. This essentially gives us the ideal path we want to be in.
- Create another spline with the previous path as the starting points (you could use a subset of the previous path too for more agile response). And add points from the waypointSpline into this. This spline is now the LaneTracker. This now clubs the path that we currently are with the ideal path, making a smooth trajectory from start to finish.
- Create another spline (see what I meant when I said heavily depend), to smoothen the velocity changes from the current velocity (can include all previous path velocities) to the destination velocity (s/time). Let’s call this VelocityTracker. This ensures that we can follow our ideal trajectory without violating jerk / speed constraints.
- Now we can generate the trajectory in the local car’s reference, by estimating the x using VelocityTracker for each time instant. Then use this x as input to the LaneTracker to generate the y. Convert these points back to the world coordinates and feed them back to the simulator, and voila you are done.
Emergency Braking
During testing the system, once two other cars in front of ours collided and came to a stand still. The fact that I was using the entire previous path as input to the LaneTracker & VelocityTracker spline, meant that the car was too slow to react to this resulting in collision. So I implemented a emergency braking solution, that would ignore the previous path and hard set the trajectory to the maximum braking capable (controlled by jerk) by the car. Fortunately / Unfortunately I never got to test this on the sim, as another accident did not
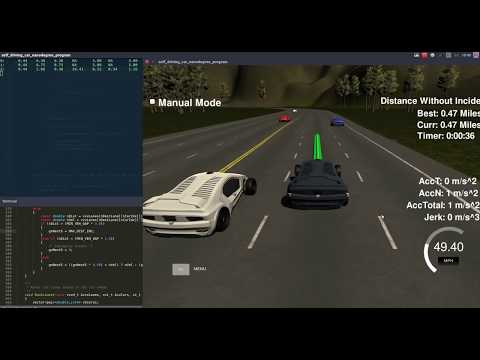
Results
The resulting video is the following
Future Work
There is still a lot of things that can be done to improve this
- Add in behaviour prediction for each dynamic object using multiple-model algorithms that will allow the system to react much better & faster to the dynamic changes.
- Improve the lane scoring using other parameters and see improvements.
- Improve the emergency braking system and test it more (might need simulator upgrades)
- Incorporate Q learning and RL to weave through the traffic (also need simulator upgrades to pass images via telemetry)
Acknowledgements
Great thanks to the community. Some of these ideas are inspired from discussions on the forums / slack / etc… The stalwarts in the community such as John Chen, Vivek Yadav have been a continuous inspiration to all of us. Also definitely thanks to the Udacity instructors David Silver and the team from Mercedes.
Comments